


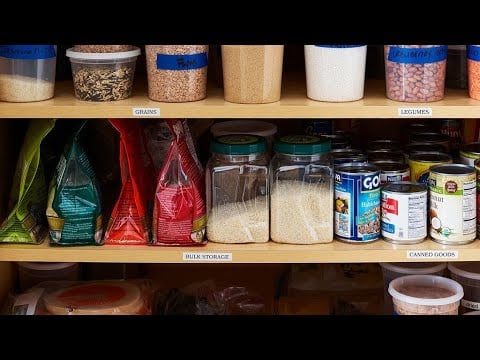


DIY Simple Pantry Shelving

If you have existing shelving that just doesn't cut it or you just want to add some to an existing pantry, this guy has some great step by steps to get you started!
Setting up a new pantry? Want to add some sturdy shelving? Join the SSLFamilyDad for this week's DIY project - Installing Simple Sturdy Pantry Shelving.
Ever since we moved into this house 5 years ago the closet off of the dinning area was a coat closet and the closet near the back door was a pantry. We always thought this was kind of strange but just lived with it all of these years. Well, the SSLFamilyMom and I are having our 5 year anniversary this week and thought this is what we should do for each other.
After the closet was emptied I started making some measurements. Each shelf support is 16" from the top of each support. You can use whatever distance you want between the shelves but I just stuck with what the old pantry was. I used a level and pencil to mark out where all of the supports would be positioned.
I ripped a bunch of 3/4" pine into 1.5" strips and then cut all the strips to length to fit the pantry. One along the back and one on each side of the pantry for each shelf.
Next, I needed to find the stud locations where I would secure each support to the wall. You absolutely need to use studs here, no drywall anchors will be strong enough. Since this wall seems to be crazy and my stud finder was all kinds of no working right I had to go back to the old school method.
To find studs without a stud finder gently knock along the wall until you hear the pitch change. You can then use a nail to tap through the drywall (behind where the support will be) to ensure there is actually a stud. Mark that location and move on to the next. Each support should be secured in at least two places but three is best.
I am using particle board for this project for two reasons; number one, it is cheap and number two, it is strong in this application. It does not bow or flex quite like plywood does and paint covers it very nicely. MDF would also work as well. I chose 3/4" particle board and cut each shelf to length to fit into my space (they can also do this for you at the big box store).
Next I predrilled all the holes for the supports with a countersink bit and used an impact driver with 2" screws to secure each support to the wall. The shelves were then set into place and a brad nailer was used to lightly secure each shelf to the supports.
I had some interior white paint leftover from when we painted the kitchen so I used that o paint the walls, shelves, and supports all the same color. Two coats will ensure that it doesn't scratch or nic off when you are dragging cans and other things in and out.
All in all this project only cost my about $20 for the particle board. I used scraps of wood for the supports and I had the paint. Even if you had to buy those you are still looking at under $50 for a nice new pantry with sturdy shelves that the kids can climb up and not get hurt(this seems to happen when we are not looking).
DeWalt 2" Brad Nailer - http://amzn.to/25QxxRH
DeWalt - Impact Driver/Drill combo kit - http://amzn.to/1toCosg
All of these products and more recommended items from the SSL Family are available at the Simple Suburban Living
General Store - http://astore.amazon.com/simpsubulivi-20
Please check us out at www.simplesuburbanliving.com
and follow us on....
http://www.pinterest.com/simplesuburban/
http://www.facebook.com/simplesuburbanliving
http://www.twitter.com/simplesuburban5
http://www.instagram.com/simplesuburbanliving
Daily Beetle by Kevin MacLeod is licensed under a Creative Commons Attribution license (https://creativecommons.org/licenses/by/4.0/)
Source: http://incompetech.com/music/r....oyalty-free/index.ht
Artist: http://incompetech.com/